

Walkthrough in Pillars of Eternity 2: Deadfire is covered on this page.
Walkthrough
In the first PoE game, you ruled a castle named Caed Nua. However, when Eothas, god of light, awakened at the beginning of PoE 2, your castle was destroyed.
You can import your save from PoE, if you don't have a save. You can edit your Pillar of Eternity history before you leave in-between. (Talk to Pallid Knight, You can choose Benevolent Soul, Fair and Balanced, Survival of the Fittest, Dark Times, Keeper of Secrets, Everything bad as your PoE history. Each background you pledged to a different god except Everything Bad history, granting different bonuses.) You can create your character when you talk to the Pallid Knight, see Character Creation for more information.
When you wake up, talk to Edér and Steward of the situation. Before you go to face the pirates, you can find some equipment inside a wardrobe. (depends on your Classes and weapon proficiency)
A storm hit the ship after the pirated been defeated, knock you unconscious and send you to Vilario's Rest. (you can chose to save a crew of yours or a crate from Caed Nua during the storm)
There are 3 quests available when you arrived the island: To Hunt a God, Helping Hands, Stranded. But before you explore the area, you should equip your Pets first. (Pets can be seen as a special type of equipment, grant party wide bonus.) Talk to Edér, and decide his class. (Fighter, Rogue or Swashbuckler)
Explore the beach, you can find lots of lootable objects and some souls. (you can use TAB to highlight objects) Asking a soul to merge with you will give you some XP.
One of the Crew, Irrena, can be found on the deck of Defiant. To get there, you need to pass Athletics check or use Rope and Grappling Hook. You can carry her back to the beach if you have 15 might and 2 Athletics, if not you need to have 2 survival skills to help her. Another crew Chitupec can be found at the north of the beach, he's been attacked by a boar so prepared for a fight. Eld Engrim can be found on a road leading east. He also gives you some clue about fixing your ship. (quest Stranded)

Beodul can be found inside Sea Cave, surrounded by some traps. Help him get rid of the traps and he will wait you outside. There are lots of enemies in the cave (skeleton, spider, construct, bat etc.), if you feel the fight is too hard or your health is too low. You can use some food to rest. If you have high Athletics skill, you can use the Underwater Passage to reach the northwest corner of the Vilario's Rest.
To repair the ship, you need to seek help from locals. Leave Vilario's Rest and head for Port Maje. Before you reach there, you will encounter some farmers on the road (Ilonet's Fork), help them and you can get some coins and reputation. There's some lootable objects on world map too so don't miss them.
The governor of Port Maje will ask you to do him a favor before he helps you repair the ship. But before you help him, you can explore Port Maje first, there's a potential companion Xoti can join your team, along with some minor tasks:
- Burning Bridges - Help Rinco get his money back from a Huana women, you can find her at Satahuzi. After you hear another part of the story, decide what to do then back to Rinco.
- Restoring Order - Help Savia at Port Meja Prison tp restore the order. Travel to Gorecci Street and take care of Ilari.
- The Better Men - Help the innkeeper to get rid of Galian.
Vist Rinco's House, Port Maje Prison and Kraken's Eye to get these tasks. After you complete them, venturing forth to Engwithan Digsite.
If you explore the island, you may find a Burial Site to the west of Port Maje, if you spend some hours explore the area you may get some fine equipment. To the east of Port Maje, there is Old Battle Ground, you can try to explore it for equipment.
If you entered Upoho Wharo Woods, you will find an old druid and some boars. If you convince him you mean no harm and just need some help to pass the woods, he will give you the Wise Teeth Necklace.
Whakura Pass has some traps set by xurips, disarm them with Mechanics skills. You can ambush the xurips later for more gain, and if you are Cipher, you can turn xurips fight each other and gain XP and coins without a fight.
Engwithan Digsite is a place with many sub-areas, like Ancient Training Hall, Foreman's Quarters, and Luminous Adra Pool. There are some enemies in these subareas as well as lootable.
At the bottom of the Arena, there are some panthers. Kill them and free the researchers in the cage nearby, you will learn what happened here and find potential companion Aloth.
Arena Sub-Level is filled with skeletons, wisps and constructs. If you find them to hard to handle, you can use the gunpowder barrel to wipe them out. (by luring them to gunpowder then light them up. Just be careful dont stand too close to the barrels.)

There is a puzzle in a room called Trial of Flame, to put out fire, you need to activate three sigils on the ground that matched the shields in previous room. (the correct sigils are top-left, top-right and bottom-left)
Oderisi's remain's can be found in front of the Pillar of Adra. Once you touched the pillar of adra, you will be connect to Eothas. However at this point you can do nothing to stop him. When you leave the area after you activate the pillar, a group of souls will appear, asking for help. (Help them earns you reputation of Xoti, and some XP)
Return to Governor Clario, you can decide to give him the note of Oderisi or not. Either way, he will help you repair the ship and instruct you travel to Neketaka. (Before you set sail, remember to buy some supplies like food and water, medical supplies and repair supplies. Remember your crew will consume foods and water daily. Also, you may want to recruit 4 crews before you leave. You need to pay their wages so don't spend all your money!)
Note: There is a rice farm at the south of the island, you can buy cheap rice there.
Once you repaired the Defiant, you will recieve 2 new tasks: Skeleton Crew and Basic Provisions. You can hire the crew and purchase the supplies at Port Maje. If you have a lot of coins to spare, you can free Rum-Dumb Riggere in the prison (The Drunk Sailor), he is a seasoned Deckhand.
A World Map:

A strange ship will approach you the first time you set sail, it's captain wants you to hunt the pirates for him. His lieutenant, Serafen, is a potential companion of yours. (Cipher/Barbarian/Witch)
Tip: Traveling on sea can be dangerous. Especially when your ship is not upgraded. After you leave Port Maje, sail north to Neketaka first, if you try to explore west you may be caught by fast pirate Dhows. (You can hunt and defeat these pirates later for Bounty Tasks.)
After you activate the first pillar, one night at sea you will have a strange dream. In this dream, some gods will communicate with you and urges you to find Eothas and what he is up to.
Note: On the island west to the Port Meja, you can find Meryel the Mad, she is wanted for Bounty - Meryel the Mad.
There is an unnamed island between Neketaka and Port Meja, on it is the Cavern of Xaur Tuk-Tuk. To explore the island you need to fight some xaurips and Desert Wurms etc in 2 encounters (Howling Gorge and Broken Spear Pass). Once you clear the Cavern of xaurips, you can save a high rank xaurip, Mother Sharp-Rock, she will follow you afterwards. Explore the ruined tower can find some supplies. (once you explore the whole island, you can name it.)
The first time you reached Neketaka, a harbor master will appear and question the nature of your visit. In reaction to her unfriendly manner, you can scare them off with the help of Pallid Knight - the goddes of death.
There's lots of merchants in Queen's Berth, as well as quests. If you have enough coin to spare, upgrade your equipment here. Also, you can buy bigger ships and all kinds of ship equipment from shipwright. (He also gives quest The Shipwright's Plight, finish it first to recieve a discount.)
Near the Sanza's Map Emporium doorstep you meet Nera Bardatto, she is searching for her brother. Larro Bardatto can be found behind distract's waterfall. However, he is engaged in duel with Orso Valera. Settle the conflict, then head back to Bardatto estate. (you will also get the quest Family Pride.)
Nera Bardatto will reward you, speak to her mother to get next quest A Sinking Feeling. (if you have high perception, you can peak her documents when you talk to Ezzali Bardatto.)
Both quests lead you to Zili Valera, he is playing flute around one of the local watchtowers.

From Zili Valera, you learn that Persa is in charge of the plot. She can be found in The Gullet tavern. Take care of her and her guards, then report to Ezzali Bardatto. (the quest A Sinking Feeling is complete here. the rest is Family Pride) Ezzali wants you to guard the vault, speak with Captain Vilami and wait for thieves. Deal with the thieves, then report to her. She gives you another job to kill Valera. Alternatively, you can visit Valera family and persuade them to abandon the plot. This way you can arrange the two families to have a truce. Otherwise, you will have to kill one family leader to complete the quest. You can also switch side and kill Ezzali. Either way the quest is complete.
In front of Vailian Trading Company Headquarters, Tawenu wants you to deal with the land contract between locals and the VTC. Listen to him and learn his situation. If you agree to intervene, you need to talk to Luca inside the Headquarters. (you can only enter the HQ in daytime)
Luca, on the other hand, told you Tawenu used forged papers in order to get the land back. You can persuade Luca to nullify the contract with diplomacy skills, or you can steal the original contract from the archive room in headquarter building. (you can find this information catching Luca in the local tavern drinking)
You can also aid Luca to get rid of Tawenu by persuading Tawenu to leave. Remember don't try to kill Luca or Tawenu otherwise this matter cant be solved legally. After the issue is settled, return to Tawenu or Luca for reward.
The governor of VTC will give you the quest Storm of Poko Kohara, but this quest will need to you leave the city so you can do it later.
Aenia can be found near the VTC HQ, she will give you various Bounty tasks. (requires you hunt pirates etc, you may want to do her task after you upgraded your ship)
In The Wild Mare, a noble woman Kahn wants her money back from an old elf Oswald. Talk to Aenalys at the second floor of Wild Mare and see if she know anything about Oswald's where about. Either you persuade Aenalys that Oswald is in danger (Perception), or search her armoire to get Oswald's journal. Return the journal to Kahn, she suspects Oswald is taken to an ancient temple near Karatapu Channel southwest of Neketaka. Abocco at the tavern can also give you some bounty tasks.
A potential companion, Konstanten, can be found at second level of The Wild Mare. He is a Chanter/Barbarian/Howler.
Leave the Queen's Berth and head for The Gullet, the slum of this city.
The Gullet is full of poorest people of Neketake, you can help them following quests and tasks:
- All Aboard (Help Biha's family get a place on ship. Need to persuade Captain Sedūzo and Dwarf Orron at The Hole to make room for Biha's whole family.)
The body of Botaro, can be found at Old City Overlook. You can read his soul to learn where he hides the money. - Harsh Medicine (Get medicine for priestess at Pitli's Sanctuary. The Medicine you need can be purchased from Ernezzo (800 cp) in Delver's Row. To get there, You can learn the information from Enoi or Fyrna in the tavern. Interact with the Narrow, turn right first, then go forward until you see a merchant stall, the entrance is behind a curtain. You need to pay a toll in order to get into the Delver's Row, or force the way in. If you dont want to pay him, you can kill the Spindle Man for him. But be careful, Spindle Man's guards can read your mind. Alternatively, you tell the plot to Spindle Man, he suggests you steal the medicine from Ernezzo.
Once you have the medicine, return to Pitli, she will reward you a Halgot's Warmth (priest ring). ) - Food for Thought
When you visit The Hole, don't forget to find Persa for quest A Sinking Feeling. Also, there's an ogre at the kitchen you can hire for ship crew.
Once you made a fame here, Dereo will send a messenger to you. Interact with the Narrow. Turn right, right, left, and tell the guards Dereo wants to meet you to enter Dereo's Lair. He will give you the quest The Cornett's Call.
You need to ask permission from Overseer Hitenga to use the old city lift, it leads you to Old City Overlook. But be careful, the lift will wait for you for only half day. If you rest in Old City Overlook, you will have you leave through Undercroft.
Old City Overlook is full of Guls and Skeleton warriors, there you can find the corpse of Botaro (All Aboard), you can read his soul to learn where he hides the money.
In the centre of Old City Overlook there are the temple ruins, if you have high Constitution (16), you can acquire a Cornet of Depth. But be careful of the enemies appeared. At the southeast corner of the Old City Overlook, there are some enemies and sigils of nightmare.
You can leave the Old City Overlook to Old City (through the northwest exit).
In Old City, if you take items from a corpse at The Gullet's Falls, all the guls in the area will rise and attack you.
You can use Cornet of Depth you found at Old City Overlook to unlock the Chamber of Tides.
Inside the chamber, there is a Giant Cave Grub. It has very high HP, can swallow your characters to cause great damage, and can summon smaller Cave Grubs. You need to reach at least level 6 to fight it. (or you can just leave it for now, come back when you visit serpent' crown and have 2 parts of the cornets.) You can get back here later when you have both Cornet of Depth and Cornet of Waves, use them to unlock the inner chamber. Lots of good equipment in there.
On the south of Chamber of Tides, there'a sigil of darkness and some enemies.
Leave Old City for Old City Ruins, there you will find another explorer sent by Dereo. The exit to Undercroft is right behind her (the southwest corner).
Mad Morena, the smuggler captain at Undercroft gives you the quest Goods and Services. And tells you unless you change the situation, she cannot smuggling food for people at The Gullet. (quest Food for Thought).
Use the lift at Undercroft to leave the area, you can then report to Dereo that you find the temple ruins. If you already meet Botaro's soul in Old City Overview, you can find his money in front of the Hole.

Now head to Periki's Overlook, if you have spare coin, you can visit merchants first. They sell better equipment compare to Queen's Berth.
In one of the shop, The Dark Cupboard, you find Bertenno steal Fassina's gloves. She asks you to find Bertenno and get back the gloves. (quest Velvet Glove, Brass Fist)
At the doorstep of Arkemyr's manor, you find two women arguing. They both want an ancient tablet in Arkemyr's vault.
If you want the tablet, you need to find a way in. Either Netehe and Tumara have some ideas. They can be found at Serpent's Crown and Brass Citadel during daytime.
Someone named Ifren may know how to get inside the vault, he's been turned into a fortune telling machine at the Dark Cupboard. Go go Dark Cupboard and speak with Ifren, you learn there is a passage to Arkmyr's manor in Luminous Bathhouse.
Degnos can be found outside the Luminous Bathhouse in Periki's Overlook. Agree to help him retrieve his satchel. (His satchel can be found at the second level of Luminous Bathhouse, in a wardrobe. ) Open it then decide how to deal him. (quest Sealed Fate)
In Watershaper's Guild, you will find another potential companion, Tekehu. He is a Druid/Chanter/Theurge.
Worthless Idiot, an imp, can be found on the garden between the Watershifter guild and Arkemyr's manor. He can be recruited as your crew, for free.
Leave the area for Serpent's Crown, there you can visit Takano's Villa. Use your watcher ability to read his soul. Point out that he doesn't really needs the artifact, it belongs to someone who truly understands it's meaning. You can then persuade him to sell the Cornet of Waves for 750cp.
Visit Muhai's estate, speak with Muhai, then find her body on her bed. Remember to take her body before you leave. (quest Her Last Request)
There's a merchant named Ereti sell all kinds of pets.
In Kahanga Palace, there an NPC named Barati will issue all kinds of bounty tasks. In the throne room, you will see a familiar face, Pallegina. She can join your team, or you can have Maia instead.
Talk to queen and prince to acquire quests. (The Brass Empire, Trade Secrets, The Last Sanctuary)
If you have already explored Undercroft and Delver's Row before, you can conclude the quest Trade Secrets now. However you can persuade the prince to let Delver's Row open.
Leave for The Sacred Stair, if you have Muhai's body, you can put it in the fire of Temple of Magran. Or let he priest there to bury her. The second option will upset Muhai greatly.
Visit the Temple of Gaun, the priest here promised to provide food for The Gullet. But you need to let the guards allow it. You can persuade Prince Aruihi at the palace to make it happen. (Otherwise you need to steal six crates of crude of luminous adra from adra mill in Queen's Berth to persuade Mad Morena and her smugglers to help you.) Either way, report to Enoi to complete the quest.
If you have Xoti in your team and you have travlled for enough time, Xoti will need to perform a rite in the Temple of Gaun. (The Lantern of Gaun)
Speak with Flaune Elette atop the Spire of the Soul-Seers at The Sacred Stair will start the quest A Glimpse Beyond. Agree to participant in the animancy experiment and you will be teleported to realm of beast of winter. FIght your way to the southeast coner. There you need to defeat Soul Collector.
The God of entropy will appear and speaks to you, afterward the portal to physical world will appear. Speak with Flaune and she will give you next quest Skipping Ahead. (you need to wait for her mensenger to start this quest)
In temple of Berath, Kasu wants you to recover some sacred text called Eulogy of the Dead. He will give you Eel's Coil to enter the Hanging Sepulchers.
Search the Hanging Sepulchers. Be careful this place has a lot of traps. Bring a character of high mechanics skill is a good idea. Also, the risen undead can appear from coffins or other corners so some enemies may be more diffcult to handle than they look.
One of the text can be found in a room at the northeast of the Hanging Sepulchers. Another is in the forgotten Moslem.
Once you find the 2 pieces of the text, read it to learn the names of the two skeleton guarding Yseyr's chamber. Interact with the skeletons to open the gate.
You can persuade Yseyr to let you take the text by history and religion skills, otherwise, you will have to take it. Bring the text back to Kasu to complete the quest.
The Brass Citadel is a region controlled by Royal Deadfire Company. Merchants in this region sell the best firearms in Neketaka. However, some of the vendors can sell goods to you unless you work for the Royal Dead Fire Company.
You can get following quests here:
Wakoyo in this area will issue bounty tasks to you.
Bertenno, the man who stole the glove from The Dark Cupboard can be found at the port. Help him pay his debt (400cp) or deal with Hamuto to get back the glove. Return the glove to Fassina to complete the quest.
Tumara can be found at the gate of Imperial Command, she will tell you Arkemyr's apprentice Fassina has the key of Arkmyr's manor.
Back to Periki's Overlook. Either enter Arkmyr's Manor through Luminous Bathhouse, or get the key from Fassina. (If you helped her get the glove in quest Velvet Glove, Brass Fist.) Or you can just unlock the front door of the manor (require 10 mechanics skill)
Tip: there's tons traps and locks in Arkmyrs Manor. So bring a character with high mechanics skill is a must. Also, Arkmyr's Manor is guarded by Ironclad constructs and steel constructs, you will need some high penetration weapons.
To unlock the vault in Arkmyr's manor you need two things, the combanition and a special gem. The combanition can be found on a note in Arkmyr's study, the gem is on a imp on the second level.
Unlock the vault, there's tons of loots inside, along with traps, and locks.
Once you get the tablet, you can decide to give it back to Tumara or Netehe. Once you complete this quest, Arkmyr will immediate send an imp to invite you. (quest A Cordial Invitation)
Back to Arkmyr's Manor and speaks with him, he will give you another quest Bekarna's Folly.
Now, you have complete most of the quests in Neketaka city. Fill your supplies and ready to set sail.
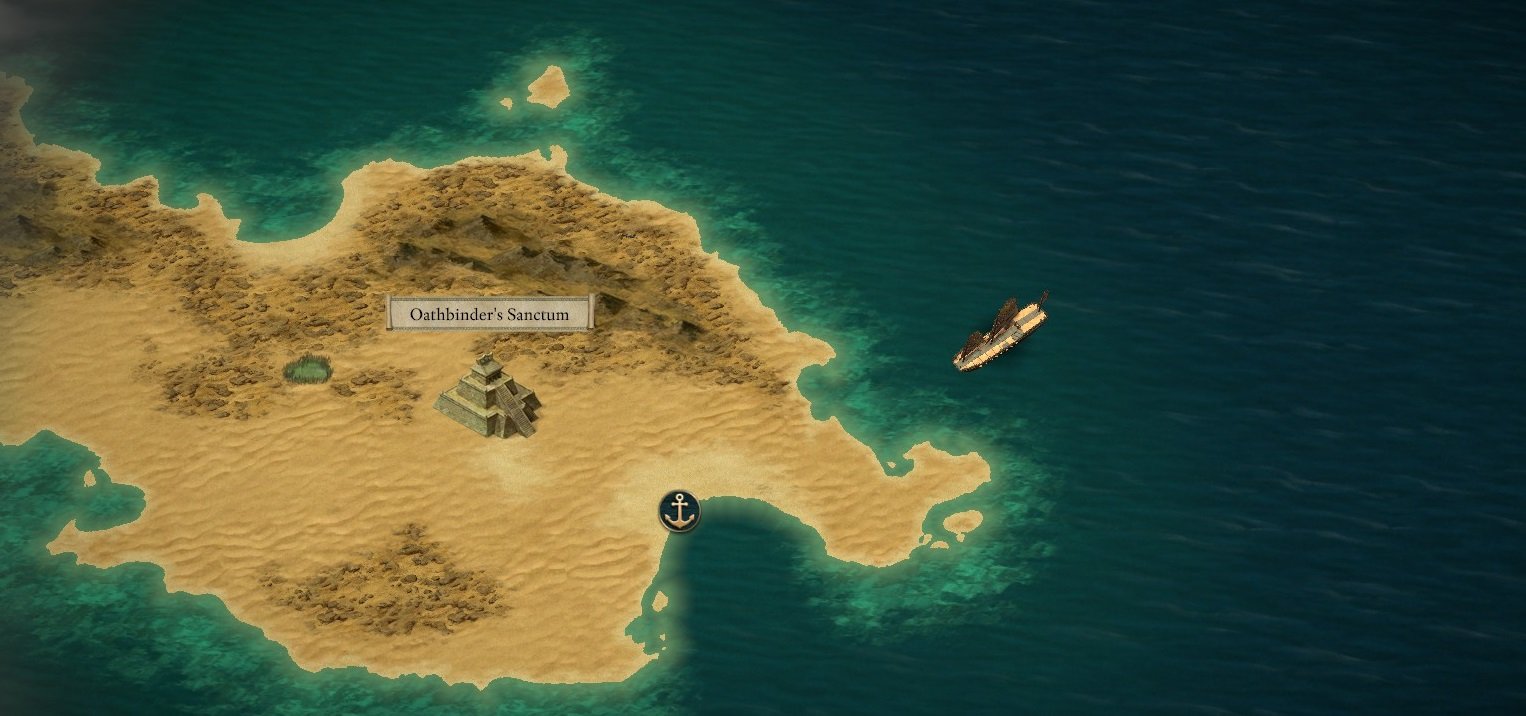
Right at the south west of Neketaka, you will find Oathbinder's Sanctum on a island, at the bottom of Oathbinder's Sanctum, you will find Oswald and some Oathbinders. Deal with the Oathbinders, if Oswald lives, he can join your crew afterward. (quest Lost Dues in Good Faith)
Tip: If your ship is upgraded, you may try to complete some bounty tasks around Neketaka. Your best strategy is to board the enemy ship as fast as possible (you can see enemy's level on the top right corner of ship combat screen.) If your ship has good connons and crew ranks are high, you may try to sink them.
Sail to Hasongo, it's marked on your world map, on the north west of Neketaka. Hasongo was visited by Eothas and controlled by nagas now. In the watcher tower near the port, you can learn from the survivors what happened.
You can use the ammunition in the workshop (near the north gate) to reload the mortar on the wall. If you have enough might and mechanics skill, you can use it to blast the naga cluster in the middle of the fort.
Reach the Lighthouse at the left side of the area, the Naga leader is guarding the adra inside. You can persuade them that it is not because of the surfacers' activity that adra became dim, and prove it by re-lit the adra. Otherwise, you need to defeat these nagas to interact the adra pillar.
Once you interact with the adra pillar you will be connected to Eothas again, after the conversation you acquired the next quest He Waits in Fire.
If Xoti is in your team, you need to let her touch the pillar after its activated, for her personal quest The Lantern of Gaun.
When you leave Hasongo, you will see a large fleet of Royal Deadfire company. Speak with them will learn some information about your next destination.
You will talk to gods again after you activate the adra pillar at Hasongo, this time by a group of different gods, they want you to keep hunt Eothas.
When you return to Neketaka, the queen will invite you to her palace. (quest From the Wreckage)
When you returned to the Neketaka, Aloth will talk to you about why he visited Deadfire archipelago. (quest The Painted Masks)
(Tips: Many companions' personal quests is available at this point. If you dont have them in your team, use team management to put them in team and acquire their personal quests. )
After you returned from Hasongo, speak to the Queen, she can be found on the rooftop of the palace. Queen Onekaza wants you to speak with the Guildmaster Mairu.
When you reached Watershaper's guild at Periki's Overlook, it is already attacked by nagas. Proceed to the sanctum beneath the Guildhall to find Mairu.
Mairu is heavily wounded when you find her, defeat the nagas, then read her soul to find out how to unlock the stone door at the entrance of the sanctum.
Defeat the nagas leaders in the sanctum to retrieve Mairu's rod. Use it to unlock the stone door. (the correct dial order is, Nagati, Moon, Rain, Moon, Hands.)
You will find Scyorielaphas, a dragon is imprisoned in the chamber. After listen to his story, you need to decide to free him or keep imprison him. (Free him and he may add you on the sea, but the queen will be upset, if you dont have enough Diplomacy skills (at least 10) she will not ally with you. Quest Fruitful Alliance failed. )
Report to the queen, don't lie to her for she can read the mind. If you free the dragon, you need at least 10 diplomacy skills to convince her you can still serve the court. (quest Fruitful Alliance)
If you have Maia in your team, you can help her Deliver a missive to Tuaha in Port Maje. (Tuaha is standing outside the tavern on the west. You must have Maia in your team to speak to her.)
Tuaha says there's some Huana man stalking her, find the huana male near by and take care of him (either persuade or kill him), then speak to Tuhaha again.
Fort Deadlight is not far away from Port Meja, visit there to complete the quest Blow the Man Down. Sail to Fort Deadlight, use Principi to avoid attack.
The Fort is full of pirates, unless you plan to kill all of them. You need to find a clever way to approach Benweth. (he is in the command). There some merchants in this fort, you may want to trade with them.
On the west side of the court, you find some pirates drinking. Challenge them to a drinking game, it will draw the attention of guards. Sneak into the forge before the guard return. Lamond in the forge recognized you but he's also planing against Benweth. To get his help, you need to free his crew first.
Use the stairs behind Lamond to reach the dungeon, his crew can be found in a brig at the southeast corner. (if you were uncovered by guards, you can kill them before they sound the alarm) Free Lamond's crew, if you can lockpick the door you can find the key on the jailer.
Back to Lamond, he proposed to steal Benweth's ship and lure him out. (or you can just storm Benweth's quarter on the second level, but he's heavily guarded) If you agree Lamond's plan, move east to the kitchen, use stairs to reach the personal dock beneath the dungeon. Kill the guards there and leave.
Go to the rooftop to sound the bell, Benweth will come out his quarter. You can decide what to do with him to complete the quest.
On the island west to the Fort Deadlight, there's Ruins of Amira's Rest where you can get some nice Grimoire, and Koro River Delta where you can get Pukestabber. Other encounters include False Mouth Forest and Blighted Bog.
Few days after you complete Blow the Man Down, you will recieve missives from Furrante and Aeldys.(quest Symbols of Death)
The southwest corner of world map lies Sandswept Ruins island. It doesn't have enemies, but tons of traps. Also, notice some traps require much higher mechanics skill to disarm. If your skill level is not high enough, you need to clear a path in traps then let your team members go through it one by one.


To put down the firewall in last chamber, you need to pull all the levers at same time. (need 4 of your team members standing next to each of the levers.)
Once you loot the coffin, the chamber will be filled with sands. You need High Might or Athletics skills to escape.
Winding Pass has some enemies waiting to ambush you, but you can find an alternative path to avoid them.
You can join the explorers at Lowland Sands, if you find the alternative path you can sell it to them for some coins.
Head back to Fort Deadlight, if you wants to work with Aeldys, you need to help Mad Morena at Neketaka first.
Dunnage is a small pirate town with severl tasks and bounties, Iron Gut requires you find three ingredients to help a pirate and A Tidy Performance needs you to find 2 performers.
To complete Symbols of Death, speak to Captain Furrante at Balefire Beacon, He asks you to help him deal with a supernature phenomena, a ghost ship.
He wants you to find any useful information about the ghost ship, if you complete the quest Eulogy for the Dead then this quest can be complete now. Otherwise, sail to Neketaka, visit the tomb under Temple of Berath at Sacred Stair district. (You need to get the Eel's Coil to open the tomb from Kasu, the Berath priest. See Eulogy for the Dead )
One of the text can be found in a room at the northeast of the Hanging Sepulchers. Another is in the forgotten Moslem.
Once you find the 2 pieces of the text, read it to learn the names of the two skeleton guarding Yseyr's chamber. Interact with the skeletons to open the gate.
Speak with Yseyr then return to Captain Furrante, he will give you the next quest A Shrewd Proposition. (You could also re-visit Aeldys to hear her porposal. )
Sail to Bekarna's observatory, it's on northwest of Neketaka. Search the library and defeat the enemies within, don't forget to collect Nuaua books and the Huntress (4 pieces in toal)
Reach the Bekarna's orrery, there you meet Concelhaut, defeat thim and his sidekicks. Use the telescope to observe the four constellations. Then activate the orrery to get Bekarna's note.
Tikiwara region is on the southeast of the Deadfire Archipelago. There's three tasks:
- Broodmother's Fury (Kill the Broodmother. Or help the Broodmother free the captured lagufaeth)
- Plucked Fruit (find the real criminal, or help Rongi frame Tamau)
- The Courier's Calling (Deliver a missive for Maia)
When you visit Tikawara, talk to Vektor near the port to learn the current situation. And learn VTC has sent a team to explore Poko Kohara. When you finished quests on Tikawara, sail to Poko Kohara. There you will find a VTC camp at northwest corner.
Explore the Engwithan Waystation, at third level, you will find a paper on Beza's body. Enter the Adra, there you will meet some spirits and learn what caused the storm. You need to decide how to stop the storms. Return to Poko Kohara after you defeated the spirits.
Sail to the island of Motare o Kōzi, some local Huana tribe want to stop you, defeat them and proceed to the ruins.
The Motare o Kōzi is full of corrupted animals and Nature Spirits, you can read the souls of the former expedition team to learn what happened. One of the expedition team member, Baltia, is still alive. If you helped her (Druid or 16 Might) you can have her as your crew.
The Map in the centre of the ruins misses 2 pieces. You need to find golden outer ring from The Rotted Lady's Tree (which you can heal be cleanse the adra), and the golden inner ring from tiger den.
Use the pieces to repair the map, the correct order is Koiki fruit, luminous adra, watershaping, and Ukaizo.
Sail to Ashen Maw, but be careful of Rathun Long boats, their common tactics is to approach your ship as fast as possible then board. Keep distance if you want to outgun them.
When you reached Ashen Maw, persuade the Rathuns to let you pass. Or fight your way in. When you reach the Lower Bridge, head to Ancient Lair first. There you can find high priestess' body and her dragon. Persuade the dragon to leave (or defeat her), then take the torc from priestess' body.
Back Jagged Keep, you can use the torc to ignite Magran's Shrine. Speak to Eothas after you lowered Magran's Shrine. He will enlighten you his purpose. (If Xoti is in your team, he will have a short discussion with her as well.)
You will be automatically transported back to Neketaka when you are done talking. There you get the next quest, The Coming Storm.
You need to form alliance to face Eothas. There are four potential alliance, VTC, Royal Deadfire Company, Huana, or Principi. Complete their faction quests to ally with them. Alternatively, you can do it alone, if you have Blackwood Hull and Dragonwing Sail. (They can be bought at Queen's Berth)
(If you have unfinished quests in Neketaka, this is the oppurnity to do it. Like The Storms of Poko Kohara, The Courier's Calling , Bekarna's Folly etc. Note: The Courier's Calling may cause some bad endings for various regions.)
If you reach level 16 at this point, you may want to explore the Splintered Reef, an undead town at southeast corner of Deadfire. Defeat the fampyr lord there to complete the quest A Paradise of the Mind, you can also save the survivors of Antelope in The Pickled Eel to complete The Final Voyage.
You may also want to visit Drowned Barrows before you sail to Ukaizo. It's on an island at 8 N 36 E. Northwest to the Ori o Koīki. (See our Locations.) You will recieve two quests there: Nemnok the Devourer and The Lost Grimoires.
VTC Faction Quests:
- For the Republics!
- Of Like Minds
- A Vote of No Confidence
- Terms of Trade
- Dirty Laundry
- Sabotage at the Brass Citadel
RDC Faction Quests:
- The Brass Empire
- Dim Prospects
- A Matter of Import
- Overgrowth
- Clearing Out Crookspur
- The Final Maneuver
Principi Quests:
- Honor Among Thieves
- Blow the Man Down
- A Dance with Death
- A Shrewd Proposition
- Symbols of Death
- Undercroft
Huana Quests:
The easiest ally you can get is Huana, since they have fewer quests. Vailian Trading Company and Royal Deadfire Company's quests require you to take hostile actions against another. In Principi quest line, you need to choose sides between Aeldys and Furrante. (you can also get a special carrack in Principi line, but it's not as good as a fully upgraded Junk.)
If you ally with Royal Deadfire Company, you will get the Blade of Takōwa, a Rauatai submarine.
Once you make an ally, or you are ready to across the storm yourself.(you need high ranked crews as well) Sail to the Ondra's Mortar at the northeast part of the archipelago. Sail across the Magran's teeth to reach there. ( you need high rank of crews to help you across the storm. Otherwise, your ship may suffer too much damage and destoryed. )
If you allied with one of the four factions, you need to defeat the rival faction's fleet before you enter the storm. There will be 2-3 battles in a row. If your ships' health dropped too low, it may not survive the storm. However, if you help the dragon in the quest The Shadow Under Neketaka, it will help you now. Once you acrossed the strom you reached Ukaizo.
(Note this game does not allow you to keep playing after you reached Ukaizo. If you want to achieve a satifying ending, complete the sidequests before you across the storm.)
The Guardian of Ukaizo is an adra construct dragon with three heads. At first, it will summon some construct enemies to join the fight. Once you damaged it to less than half HP it will summon the second head and regain some health. When it is near death, the third head will attach to it and restore its full health. You need to prepare some high penetration weapons in order win this fight.
In order to reach Moi Gweath , you need to shut down the machine at Ondra's Spire, then take the stairs at Grand Promenade.
Depend on which faction you allied with, you will meet different group of enemies at Grand Promenade. (Principi if you sail here alone.) Defeat them to proceed.
Confront Eothas at Moi Gweath, then chose what you suggest him to do.
The Forgotten Sanctum DLC
Temple of Revelation
The first quest of The Forgotten Sanctum DLC, Hidden Depths, can only be acquired when you sailing on the sea. (the chance of this random encounter is not very high so you may need to sail for some time.) After the meeting with Llengrath, travel to Hall of the Unseen (On an island of the southeast region of Deadfire archipelago, see Locations if you don't know where it is), in the center chamber, you will meet Llengrath again, follow her to the Temple of Revelation.
Speaking with Tayn and Llengrath will give you some new quests (Under Observation, Annotated History). The Imps here can sell you some items/potions, and let you rest. Head to The Central Stacks or The Enclosures to proceed.
The Central Stacks
Enter the central stacks, the librarians here will tell you about Maura and how she was chased by one masked wizard. You can explore this area peacefully. But steal books will turn librarians hostile. (you can distract them first then steal the books. They won't attack you as long as you are not caught.)
In the Catalog Room, you will find Infested (pet) and Catalog Record: Bekarna's Celestial Grimoire (Wasting Minds).
To open the door to Restricted Section, you need to place 2 books on the indentations. See below:
- While scions of forest and adra fought, the dreams of invaders died: The Founding of Readceras
- They carried potential born of a word and shared like a secret: The Tribe of the People of the Deer
Ignore vault door in the center by now andhead east first. Defeat some sporelings and infested librarians, loot The Annals of Llengrath, Volume I of V, which will trigger the Root and Branch quest. Head to Quarantined Section.
Quarantined Section
You can investigate the blood red armor, breaking its enchantment to acquire Disenchanted Amulet of Animation. Loot the armor to acquire Crimson Panoply and Crimson Plate Helm. Alternately, swipe the necklace to fight it (and the animated weapons it summons.)
There are four The Annals of Llengrath in this region. One in the upper right the chamber. One in the bottom left the chamber, guarded by some sporelings. One in the middle-left chamber. One in upper left chamber. After you collect all 5 of the Annals, you can return to Llengrath to complete the quest Root and Branch.
Bekarna's Depleted Grimoire can be found in the southwest room. (for quest A Rising Star)
The west exit takes you to a locked room of Restricted Area, an imp boss named Notnok is there. Defeat him and loot a legendary greatsword.
In the room of Giant Luminscent Spore, defeat the self-claimed Llengrath to get the Spore Encrusted Key and Maura's Infested Grimoire. Use the key to unlock the south-central door, then take the exit to The Central Stacks. ,This time, you need to get the book held by the statue at the upper part of the region. Then you can open the door to The Oratory of Wael. But before you head there, you can explore the Restricted Section first.
Restricted Section
From Quarantined Section, you can enter the Burrowed Hole, an imp boss named Notnok is there. Defeat him and loot a legendary greatsword.
To open the upper right door to The Central Stacks, you need to put four books on the indentations. From left to right, The History of Eora, Vol 7, Vol 10, Vol 9 and Vol 5.
The Oratory of Wael
Once you entered this region, you will find Fyonlecg killed Maura. The masked wizard will turn on you next, and he can use environment mechanics to attack you, so stay alert and keep your group away from the energy beam. After you destroyed the two power conduit on the west and east, Fyonlecg will join the fight himself. Be careful he can summon tentacles and mirrored souls.
After you defeated Fyonlecg,v you can find the book Maura was looking for at bookshelf near her body. If you have Bekarna's grimoire, you can place it on the table of chief librarian's room in midnight. (For A Rising Star. You can come back later for this quest.)
If you come back after defeated the Oracle of Wael, you will find Maura's body got infested by spores. She will attack you with some sporelings, defeat her and get Maura's Grasping Belt.
The Scriptorium
The first time you reached here, you can learn some information from the chief librarian. Throw the Heldr's Horn (get at The Assembly of Echoes) in the Incinerator, and place the Memoirs of Heldr on the lectern to open the chest in the north end of the room to appear. Open it to find The Weyc's Oracular Focus (legendary small shield). If you dont have the required item dont worry, you will revisit this place later.
If you already explored both collection and library, you can now use the key you get at The Assembly of Echoes to interact with the machine in the middle. You need to sacrifice the memory to use this machine to reveal the stairs to The Upper Bowels.
If you haven't explored both locations, back to Temple of Revelation and head to another area.
The Enclosures
When you explore this area, don't destroy Mouths of the Organs, otherwise, the prisoners will attack you.
In the southwest enclosure, you can find a Dreadbeast, defeat it to get pet unusual dog. Speak Bekarna at Wizard's enclosure to get the quest Wasting Minds.
The Lift Enclosure Key to the lift can be found at the upper left area on a table.
Spun Terrace
There are lots of spiderlings in the area, you can find Robes of the Weyc near the Confiscated Sundries.
The Recipe - Entrancing Daze (quest item)can be found at Spidery Hatchery. At Southeast, you can find Adorable Spider / Giftwrapper (pet) and Vithrack Silk Slippers. If you like, you may return now to Drowsy Puke and ask him about the recipe, after which he can offer you a new rest option that grants resistance to Intellect afflictions.
If you give the Warden Contract (found at ??) to Sissak in his nest, you can avoid fighting him and buy stuff from merchant afterwards. (Or you can kill him and loot the Third Eye )
Hall of Reconfiguration
If you entered the Bloody Chamber, the frightened child will summon some imaginary friends and attack you.
Enter Flesh Management (you can loot Flesh Controller Room Key from Alcove of Incision, but beware this will turn the librarians against you) and give the machine a soft squeeze to cause the nearby Flesh Constructs to ally with you; give it a hard squeeze to destroy them.
Two pets, Shrunken Horse / Lucero and Docile Oozling / Ooblit can be found in the waiting room. Use stealth mode to steal them or fight the librarians.
Interact with the table in Alcove of Incision to get fungal fertilizer, you can use it to avoid a fight with the Giant Luminscent Spore boss. (at Quarantined Section)
The book (Advanced Wistful Stargazing) for quest Wasting Minds, can be found at Alcove of Incision of Hall of Reconfiguration. You need to steal it or fight librarians.
The Assembly of Echoes
Loot the area to acquire the Heldr's Horn. Defeat The Memory Hoarder you can loot The Left Hand of the Obscured.
Approach the nexus, which will present you with three choices:
Read Tayn's spell into the aperture: Return to Tayn later and he'll inform you he wrote a little something extra into his spell that will cause the prisoners who knew too much to be "extra talkative", thus revealing the secrets the Hand Occult tried to suppress. You will receive 11810 XP and 5x Implosion Charge.
Read Llengrath's spell into the aperture: Return to Llengrath and she says you sent the souls to their next life. You will receive 11810 XP and some valuable potions.
Reach down into the mouth of the instrument: You will an acquire an egg. The egg will hatch later (when you return to Temple of Revelation) and give you a pet.
If you have explored both the library and the Enclosures, you can now use the key you get at The Assembly of Echoes to interact with the machine in The Scriptorium. You need to sacrifice the memory to use this machine to reveal the stairs to The Upper Bowels.
The Upper Bowels
Quest item Fungal Ingredient can be found at Fungal Growth.
Quest item Outer Godseed Fragment can be found at Archives Subbasement.
At Archives Subbasement, place History of Eora Tomes as listed below to open the door to Alchemical Chamber:
- The gods lost them, but we will find them again: The History of Eora Vol XI
- They think their difference is a blessing when it is but a brand: The History of Eora Vol XIV
- Death comes for all in time: The History of Eora Vol XIII
- In their fear, they will give her power and ask for safety. But she will only give them orders: The History of Eora Vol XV
Defeat the enemies in Alchemical Chamber, you can find Fungal Growth Concerns and Antiseptic Creams on a table. Add them to the reservoir nearby to clog the ducts.
At Celestial Remnant, you can get a Fragment of Starmetal (For quest Out of the Eternal Horizons) when interacting with the minerals. (you can try to commune with the spirits or sacrifice your pet)
At the Observation Center, after you defeated the enemies there, destroy the two Polyps to neutralized the giant eyeball.
Another Outer Godseed Fragment can be found at Memory Siphon, be careful when you fight enemies there, don't step on runes otherwise you may be killed by hazards.
Steal the Alchemical Charge on a table in Excavation Site. (or take it by force) Then use it to blow the last bile conduit.
Once you sabotaged all three bile conduit, descend to The Heart of Mystery.
The Heart of Mystery
You need to face the Oracle of Wael here, so make sure your team is buffed, and have enough potions/scrolls.
The Oracle is weak to all afflictions except those of the mind, but it can summon minions. Put them down first, then focus fire on the Oracle, it will fall quickly.
After you defeat the oracle, you will meet Wael and decide what to do with its body. (if you have the skull of Concelhant, you can give the body to him. Either way, the main quest of The Forgotten Sanctum is completed.)
The last piece of the artifact (quest The Seeds of Deception) is on the opposite side of the Oracle. Find it and return to Tayn.
I sailed alone and the Rauatai arrived at the Grand Promenade. Testing might need to be done.
0
+10
-1